Policy Center
Use the Policy Center to send policy documents to employees, have them acknowledge each one, and see who has and has not. Each acknowledgement is recorded with the date, time and a reference number, so you can show that someone was told.
Where:
- My Team › Tools & Reports › Policy Center
- My Team › Settings, under Documents & Compliance › Policy Center
The page has two tabs, Policy Library and Issuances.
You need:
- The Policy Library right: read opens both tabs, write lets you add and change policies
- The Issue Policies right to issue policies, send reminders and remove someone from a policy
- Nothing for employees to acknowledge their own policies
How it works
- You upload a policy and publish it. Nobody receives it yet.
- You issue it to employees, or switch on Auto-issue.
- Each employee who receives it is stopped by a Policy Acknowledgement Required screen until they acknowledge it.
⚠️ The screen appears as soon as a policy is issued, not on the due date. Employees cannot use KAMI on the web until they have acknowledged every outstanding policy. Tell them before you issue to a whole company.
New companies start with a set of starter policies, such as an Employee Code of Conduct and a Leave Policy. They are drafts with no audience, so nothing reaches anyone until you review and publish them.
Looking for automatic disciplinary letters or probation documents? That is Custom Policies, a different page.
How to add a policy
- On the Policy Library tab, select Upload Policy.
- Enter the Policy Name, Category, Version and Effective Date. These are required. The categories are HR Policy, Conduct, IT Security, Safety and Benefits.
- Add a Description if you want one.
- Under Policy Document, select Browse File and choose a .pdf or .docx file of up to 10 MB.
- To issue it to new joiners automatically, turn on Auto-issue and set Due within (days).
- Under Target Audience, choose Departments, Subsidiaries, Positions or Groups. Leave them all empty to cover every active employee. If you fill in more than one, a person must match all of them.
- Select Publish, or Save as Draft to finish it later.
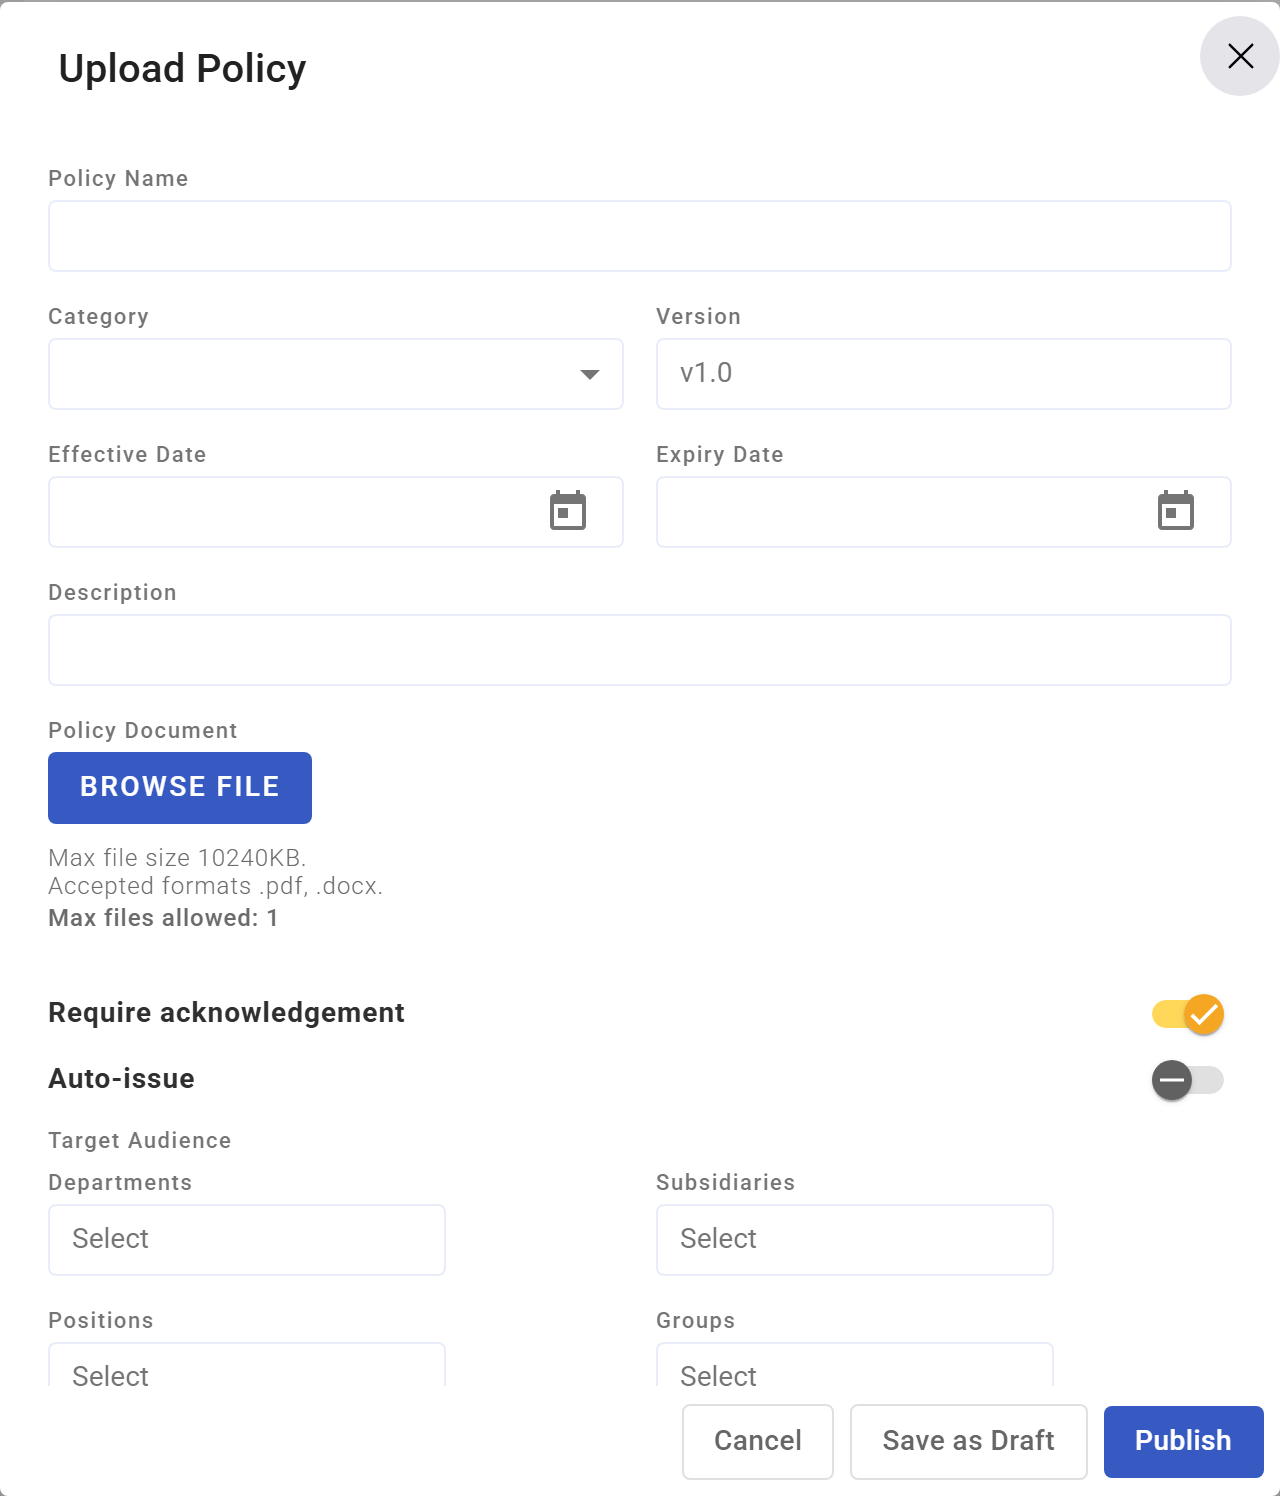
Expiry Date is for your records. Nothing happens automatically when it passes. Require acknowledgement is on by default, but at present everyone a policy is issued to is asked to acknowledge it either way.
How to issue a policy
Only a published (Active) policy can be issued.
- On the Issuances tab, select Issue Policy. You can also select Issue on an open policy, or Issue to employees from its row menu.
- Under Choose a policy, pick the policy. Only Active policies are listed.
- Under Recipients, choose one:
- All eligible: everyone in the policy's target audience - By Department: those departments, within the target audience - Individual: the people you pick, whether or not they are in the target audience
- Set a Due Date if you want one.
- Leave Email Notification on to email them as well. The In-app notification is always sent.
- Leave Skip if already acknowledged this version on, so nobody is asked twice. It also skips anyone who already has this version pending.
- Select Issue. It stays greyed out until someone is chosen.
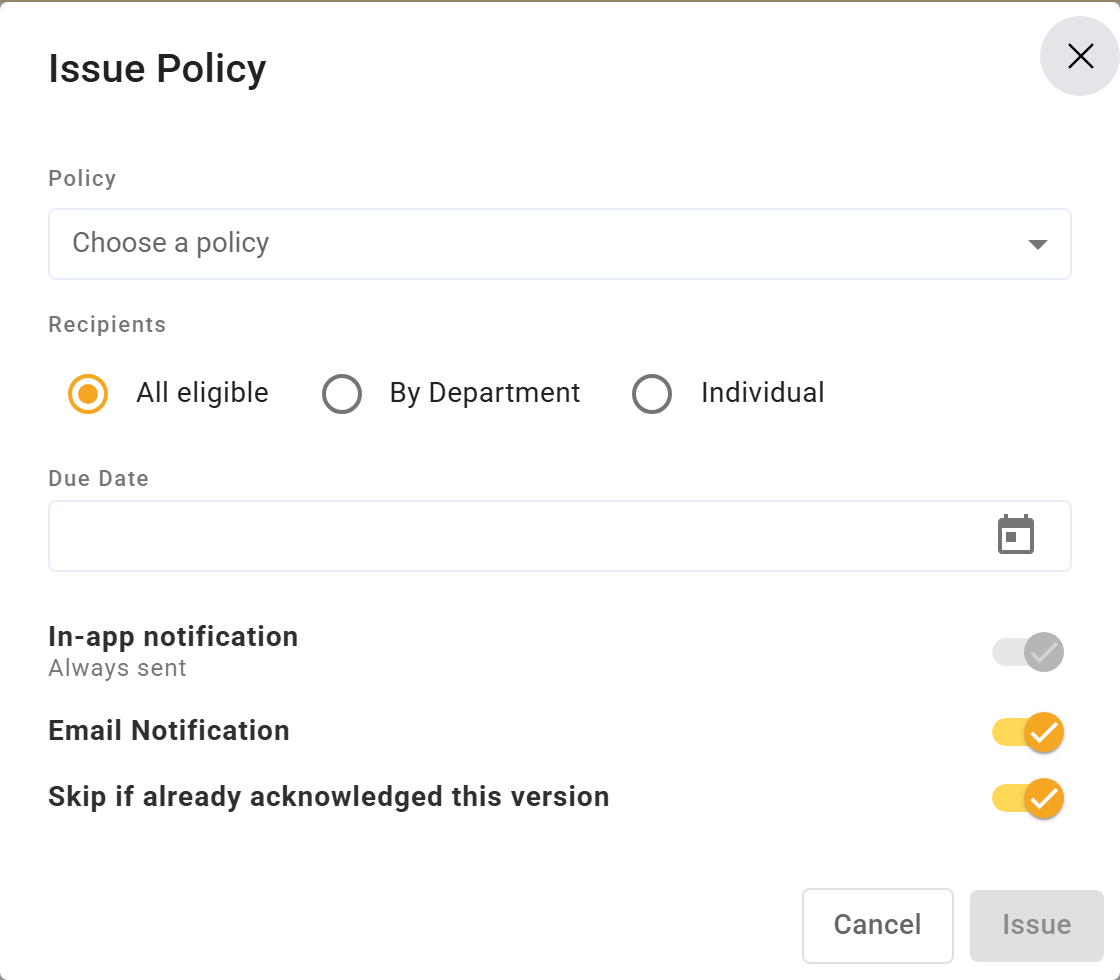
Issuing runs in the background, so it can take a moment for everyone to appear on the Issuances tab.
How employees acknowledge a policy
- On the Policy Acknowledgement Required screen, select Open Document and read it. Open Again reopens it.
- Tick the box to confirm you have read and understood it.
- Select Confirm Acknowledgement.
If there are several, the screen shows "Policy 1 of 3" and the next one follows. Employees can see every policy issued to them on their profile, on the Employment tab under Company Policies. They only see policies issued to them, not the whole library.
How to see who has acknowledged
Open the Issuances tab. The pills at the top show Total, Acknowledged, Pending and Overdue. Each row shows the employee, policy, Issued Date, Due Date, Ack Status and Acknowledged On. Filter by policy, department or status. Click a name to open their profile.
| Ack Status | Means |
|---|---|
| Pending | Issued and not yet acknowledged |
| Overdue | Pending, and the due date has passed |
| Acknowledged | Done, and recorded |
| Removed | No longer required. The record is kept |
On the Policy Library tab, each policy shows Issued (out of those eligible) and Ack rate, such as "12 ack'd / 3 pend / 1 OD", "Not issued" or "All acknowledged". Search and filter the library by All Categories and All Status (Draft, Active, Archived). An Auto badge marks policies with auto-issue on.
Click a policy to open its panel. Overview shows the acknowledgement rate, how many were issued, acknowledged, pending and overdue, its dates, whether auto-issue is on, and its audience. Issuances lists everyone it went to, with Remind Overdue.
How to chase or remove someone
KAMI does not send reminders by itself, so chasing is up to you.
- Remind one person: on the Issuances tab, select the bell icon on their row.
- Remind everyone overdue: select Send Reminder to All on the overdue banner, or Remind Overdue in the policy's panel.
- Stop asking someone: on a Pending or Overdue row, select the remove icon, enter a Reason, then select Remove.
When someone's profile is deactivated, their pending policies are removed automatically, with the reason "Employee terminated".
How to update a policy
- On the Policy Library tab, select the policy, then Edit.
- Upload the new document and change the Version.
- Select Publish. On an Active policy, Save as Draft saves your changes without unpublishing it.
- Select Issue and send it again, with Skip if already acknowledged this version on.
People who acknowledged the old version are asked again, because they have not seen this one. If you do not change the Version, they are skipped.
The ... menu also has View document, Download Document and Duplicate as Draft, which copies everything except the document and adds "(Copy)" to the name. To stop using a policy, select Archive Policy. It can no longer be issued, but anyone with it still pending is still asked, so remove them if that is no longer needed. Delete Policy also deletes its acknowledgement records, so archive instead.
What Happens Next
- Each acknowledgement stores the date and time, IP address and a reference number such as ACK-2026-00312. It stays on the employee's profile.
- Auto-issue reaches people when they become active, or when their department, position, subsidiary or employment type changes, and always by email. Adding someone to a profile group doesn't trigger it. Publishing does not send it to current staff, so issue it to them once by hand.
- If your company has KAMI AI, select Summarise with AI on an open policy so Kita can answer questions from it. Only PDF policies can be summarised. Do it again when the summary shows Out of date, with Regenerate.
Tips
- Issue at a quiet time. Everyone is stopped at their next visit, so avoid the start of a shift or payroll day.
- Check the document before you publish. Once it has been acknowledged, a fix means a new version and asking everyone again.
- Use one naming style for versions, such as v1.0 and v1.1, so the list stays easy to read.
- Upload policies as PDF if you want Kita to answer questions from them.
Troubleshooting / FAQ
Q: How do I make employees read and accept a policy? Upload and publish it on the Policy Library tab, then issue it. See the steps above.
Q: How do I see who has not acknowledged? On the Issuances tab, set the status filter to Pending or Overdue.
Q: I turned off Require acknowledgement but people are still asked. That is how it works at the moment. Everyone a policy is issued to is asked to acknowledge it, whatever this setting says.
Q: An employee cannot find a policy. They only see policies issued to them. Check the Issuances tab, and issue it to them if they are missing.
Q: I published a policy but nobody received it. Publishing does not send it. Select Issue.
Q: Why can't the employee select Confirm Acknowledgement? They have to open the document first, then tick the box.